
Term Project: Image Classifier using Wild Animals Images DataSet from Kaggle
Classification:
Classification between objects is a fairly easy task for all of us, but it
has proved to be a complex one for machines and therefore image
classification has been an important task within the field of machine learning.Image classification refers to the labeling of images into one of a number of predefined classes.
Some examples of image classification include:
- Labeling pen as stationary object or not (binary classification).
- Assigning a name to photograph of a face (multiclass classification).
Structure of an Image Classification Task
- Image Preprocessing - The aim of this
process is to improve the image data(features) by suppressing unwanted
distortions and enhancement of some important image features so that our models can benefit.
- Detection of an object - Detection
refers to the localization of an object which means the segmentation of
the image and identifying the position of the object of interest.
- Feature extraction and Training- This
is a crucial step wherein statistical or deep learning methods are used
to identify the most interesting patterns of the image, features that
might be unique to a particular class and that will, later on, help the
model to differentiate between different classes. This process where the
model learns the features from the dataset is called model training.
- Classification of the object - This step categorizes detected objects into predefined classes by using a suitable classification technique that compares the image patterns with the target patterns.
Image Pre-processing
Pre-processing is a common name for operations with images at the lowest level of abstraction — both input and output are intensity images.
Steps for image pre-processing:
- Read image
- Resize image
- Data Augmentation
- Gray scaling of image
- Reflection
- Gaussian Blurring
- Histogram Equalization
- Rotation
- Translation
Step 1
Reading Image
In this step, we simply store the path to our image datasets into a
variable and then we create a function to load folders containing images
into arrays so that model can deal with it.
Step 2.
Resize image
Some images captured by a camera and fed to our AI algorithm vary in
size, therefore, we should establish a base size for all images fed into
our AI algorithms by resizing them.
Step 3
Data Augmentation
Data augmentation is a way of creating new 'data' with different
orientations. The benefits of this are two-fold, the first being the
ability to generate 'more data' from limited data and secondly, it
prevents over fitting.
Data Augmentation Techniques:
- Gray Scaling
The image will be converted to gray scale (range of gray shades from white to black) the computer will assign each pixel a value based on how dark it is. All the numbers are put into an array and the computer does computations on that array.
- Reflection/Flip
A vertical flip is equivalent to rotating an image by 180 degrees and then performing a horizontal flip.
- Gaussian Blurring
Gaussian smoothing is the result of blurring an image by a Gaussian function. It is a widely used effect in graphics software, typically to reduce image noise.
- Histogram Equalization
Histogram increases global contrast of an image using the image intensity histogram. - Rotation
This is yet another image augmentation technique. Rotating an image might not preserve its original dimensions (depending on what angle you choose to rotate it with)
Sample code for Initialising/Loading Initial Libraries:
from keras.utils import np_utils
from tensorflow.keras.utils import to_categorical
Sample code for Reading data/Importing Dataset :
! pip install -q kaggle
#below method helped me to download datasets that are not listed in the kaggle competitions.
Image Classification Techniques
We will start with some statistical machine learning classifiers like Support Vector Machine, Artificial neural network (ANN),K-NearestNeighbors (KNN) ,Decision Tree and then move on to deep learning architectures like Convolutional Neural Networks(CNN)
Different classifiers are added on top of this feature extractor to classify images.
To support out performance analysis, the results from an Image classification task used to differentiate between 6 classes namely-
:: ['cheetah','fox','hyena','lion','tiger','wolf'].
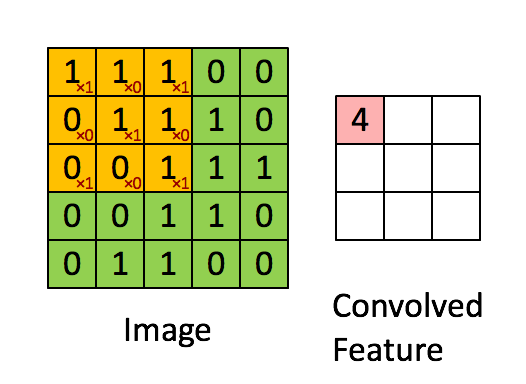
1) Convolutional Neural Networks(base Model)

Convolutions occur in convolution layer which are the building blocks of CNN. This layer generally has
- Input vectors (Image)
- Filters (Feature Detector)
- Output vectors (Feature map)
Batch Normalization
Batch normalization is generally done in between convolution and
activation(ReLU) layers. It normalizes the inputs at each layer, reduces
internal co-variate shift(change in the distribution of network
activations) and is a method to regularize a convolutional network.
Batch
normalizing allows higher learning rates that can reduce training time
and gives better performance. It allows learning at each layer by itself
without being more dependent on other layers. Dropout which is also a
regularizing technique, is less effective to regularize convolution
layers.
Padding and Stride
Padding is used to make dimension of output equal to input by adding zeros to the input frame of matrix.
Padding allows more spaces for kernel to cover image and is accurate
for analysis of images. Due to padding, information on the borders of
images are also preserved similarly as at the center of image
Stride controls how filter convolves over input i.e., the number of pixels shifts over the input matrix. If stride is set to 1, filter moves across 1 pixel at a time and if stride is 2, filter moves 2 pixels at a time. More the value of stride, smaller will be the resulting output and vice versa.
ReLU Layer (Rectified Linear Unit)
ReLU is computed after convolution. It is most commonly deployed activation function that allows the neural network to account for non-linear relationships. In a given matrix (x), ReLU sets all negative values to zero and all other values remains constant.
Pooling / Sub-sampling Layer
Next, there’s a pooling layer. Pooling layer operates on each feature map independently. This reduces resolution of the feature map by reducing height and width of features maps, but retains features of the map required for classification. This is called Down-sampling.
Pooling can be done in following ways :
- Max-pooling : It selects maximum element from the feature map. The resulting max-pooled layer holds important features of feature map. It is the most common approach as it gives better results.
- Average pooling : It involves average calculation for each patch of the feature map.
It progressively reduces the spatial size of representation to reduce amount of parameters and computation in network and also controls overfitting. If no pooling, then the output consists of same resolution as input.
There can be many number of convolution, ReLU and pooling layers.
Initial layers of convolution learns generic information and last layers
learn more specific/complex features. After the final Convolution
Layer, ReLU, Pooling Layer the output feature map(matrix) will be converted into vector(one dimensional array). This is called flatten layer.
Fully Connected Layer
Dropout is an approach used for regularization in neural networks.
This
dropout rate is usually 0.5 and dropout can be tuned to produce best
results and also improves training speed. This method of regularization
reduces node-to-node interactions in the network which leads to learning
of important features and also helps in generalizing new data better.
Soft-Max Layer[3]
Soft-max is an activation layer normally applied to the last layer of network that acts as a classifier. Classification of given input into distinct classes takes place at this layer. The soft max function is used to map the non-normalized output of a network to a probability distribution.
- The output from last layer of fully connected layer is directed to soft max layer, which converts it into probabilities.
- Here soft-max assigns decimal probabilities to each class in a multi-class problem, these probabilities sum equals 1.0.
- This allows the output to be interpreted directly as a probability.
Convolutional Neural Networks with transfer learning-VGG16[1]

130/130 [==============================] - 0s 2ms/step
Total test time taken  1 seconds ####
CNN is 100.0% accurate
Convolutional Neural Networks without transfer learning
# model will predict an array of probabilites for each label
# the max prob will give us the most likely label for that image
Y_result = cnn_model.predict(X_test)
Y_pred = []
for arr in Y_result:
indices = np.where(arr == np.amax(arr))
# print(type(indices[0][0]))
Y_pred.append(indices[0][0])
Y_pred = np.array(Y_pred)
Y_pred = np_utils.to_categorical(Y_pred, n_classes)
EndTime=time.time()
print(f"CNN without transfer learning is {accuracy_score(Y_pred,bY_test)*100}% accurate")
17/17 [==============================] - 0s 7ms/step
CNN is 98.25918762088975% accurate
130/130 [==============================] - 1s 8ms/step - loss: 3.4371e-06 - accuracy: 1.0000
[3.4370707453490468e-06, 1.0]
It is a supervised machine learning algorithm [2] used for both regression and classification problems.When used for classification purposes, it separates the classes using a linear boundary.Support Vector Machines


1) SVM[2] with CNN for feature extraction
0.2804642166344294
2) SVM with flattened image array
==================== Memory Usage Before SVM run ====================
total 89639694336
available 61352894464
percent 31.6
used 42073989120
free 38318030848
active 748576768
inactive 49804509184
buffers 342732800
cached 8904941568
shared 13901824
slab 318210048
==================== CPU Usage Before SVM run ====================
CPU percent: 10.6%
TYPE: <class 'pandas.core.frame.DataFrame'> <class 'pandas.core.series.Series'>
SHAPE: (4135, 150528) (4135,)
==================== Memory Usage After SVM run ====================
total 89639694336
available 61347926016
percent 31.6
used 47062056960
free 33326522368
active 751353856
inactive 54790598656
buffers 345419776
cached 8905695232
shared 13901824
slab 317042688
==================== CPU Usage After SVM run ====================
CPU percent: 99.1%
Total training time taken  487 seconds ####
Total test time taken  1629 seconds ####
The svm is 87.62088974854933% accurate
0.8762088974854932
Decision Trees

Source: HackerEarth
This method consists of 3 parts:
- Partitioning the nodes
- Finding the terminal nodes
- Allocation of the class label to terminal node
1) DT with CNN as base model/feature extractor using Keras with Tensorflow backend
==================== Memory Usage After DecisionTreeClassifier run ====================
total 89639694336
available 60961923072
percent 32.0
used 47277359104
free 33100537856
active 759427072
inactive 55002128384
buffers 353038336
cached 8908759040
shared 13910016
slab 318291968
==================== CPU Usage After DecisionTreeClassifier run ====================
CPU percent: 92.6%
Total training time taken  0 seconds ####
The decision tree is 26.723095525997582% accurate
Total testing time taken  0 seconds ####
2) DT with flattened image array
==================== Memory Usage After DecisionTreeClassifier run ====================
total 89639694336
available 60164022272
percent 32.9
used 49880043520
free 30492123136
active 761970688
inactive 57602969600
buffers 355573760
cached 8911953920
shared 13910016
slab 319504384
==================== CPU Usage After DecisionTreeClassifier run ====================
CPU percent: 8.2%
Total training time taken  193 seconds ####
The decision tree is 29.40038684719536% accurate
Total testing time taken  1 seconds ####

K Nearest Neighbour


Here we can see there are two categories of images and that each of the data points within each respective category are grouped relatively close together in an n-dimensional space.
Code
1) KNN with CNN as base model/feature extractor using Keras with Tensorflow backend:
==================== Memory Usage After KNeighborsClassifier run ====================
total 89639694336
available 60164100096
percent 32.9
used 49880375296
free 30491791360
active 761962496
inactive 57603002368
buffers 355573760
cached 8911953920
shared 13910016
slab 319475712
==================== CPU Usage After KNeighborsClassifier run ====================
CPU percent: 9.3%
Total training time taken  0 seconds ####
The K Nearest Neighbor  is 96.590084643289% accurate
==================== Memory Usage After KNeighborsClassifier run ====================
total 89639694336
available 60163813376
percent 32.9
used 49880662016
free 30491500544
active 761962496
inactive 57603002368
buffers 355573760
cached 8911958016
shared 13910016
slab 319479808
==================== CPU Usage After KNeighborsClassifier run ====================
CPU percent: 10.3%
Total testing time taken  0 seconds ####
0.96590084643289
2) KNN with flattened image array:
==================== Memory Usage After KNeighborsClassifier run ====================
total 89639694336
available 60164431872
percent 32.9
used 49880068096
free 30491963392
active 761966592
inactive 57603604480
buffers 355573760
cached 8912089088
shared 13910016
slab 319389696
==================== CPU Usage After KNeighborsClassifier run ====================
CPU percent: 9.1%
Total training time taken  1 seconds ####
The K Nearest Neighbor is 75.43520309477756% accurate
==================== Memory Usage After KNeighborsClassifier run ====================
total 89639694336
available 60164100096
percent 32.9
used 49876209664
free 30495694848
active 762052608
inactive 57599287296
buffers 355655680
cached 8912134144
shared 13910016
slab 319311872
==================== CPU Usage After KNeighborsClassifier run ====================
CPU percent: 72.5%
Total testing time taken  0 seconds ####
[[162   6  14  21   0   2]
 [ 20 114   4   5   5   2]
 [ 23   6 127  21   2   4]
 [  6   5   8 154   2   2]
 [ 18   9  16  11 105   2]
 [  7  11   9  11   2 118]]
Artificial Neural Networks


Epoch 1/10
42/42 [==============================] - 2s 32ms/step - loss: 5.0582 - accuracy: 0.1671
Epoch 2/10
42/42 [==============================] - 1s 30ms/step - loss: 4.9535 - accuracy: 0.1586
Epoch 3/10
42/42 [==============================] - 1s 33ms/step - loss: 4.4529 - accuracy: 0.1640
Epoch 4/10
42/42 [==============================] - 1s 33ms/step - loss: 0.6932 - accuracy: 0.1797
Epoch 5/10
42/42 [==============================] - 1s 32ms/step - loss: 0.6932 - accuracy: 0.1838
Epoch 6/10
42/42 [==============================] - 1s 31ms/step - loss: 0.6931 - accuracy: 0.1746
Epoch 7/10
42/42 [==============================] - 1s 34ms/step - loss: 0.6931 - accuracy: 0.1734
Epoch 8/10
42/42 [==============================] - 1s 31ms/step - loss: 0.6931 - accuracy: 0.1739
Epoch 9/10
42/42 [==============================] - 1s 34ms/step - loss: 0.6931 - accuracy: 0.1816
Epoch 10/10
42/42 [==============================] - 1s 31ms/step - loss: 0.6931 - accuracy: 0.1763
Model: "sequential_4"
_________________________________________________________________
 Layer (type)                Output Shape              Param #
=================================================================
 dense_8 (Dense)             (None, 16)                2408464

 dropout_3 (Dropout)         (None, 16)                0

 dense_9 (Dense)             (None, 32)                544

 dropout_4 (Dropout)         (None, 32)                0

 dense_10 (Dense)            (None, 2)                 66

 flatten_4 (Flatten)         (None, 2)                 0

=================================================================
Total params: 2,409,074
Trainable params: 2,409,074
Non-trainable params: 0
_________________________________________________________________1) Input of image data into the CNN model, which is processed with help of pixel values of the image in convolution layer.Summary:
2) Filters are generated that performs convolutions over entire image and trains the network to identify and learn features from image, which are converted to matrices.
3) Batch normalization of input vectors is performed at each layer, so as to ensure all input vectors are normalized and hence regularization in network is attained.
4) The convolutions are performed until better accuracy has attained and maximum feature extraction is done.
5) Convolutions results in sub-sampling of image and dimensions of input gets changed according to padding and stride chosen.
7) After the final convolution, the input matrix is converted to feature vector. This feature vector is the flattened layer.
8) Feature vector serves as input to next layer(fully connected layer), where all features are collectively transferred into this network. Dropout of random nodes occurs during training to reduce overfitting in this layer.
9) Finally, the raw values which are predicted output by network are converted to probabilistic values with use of soft max function.
Issues
-Issue 1: Different models were expecting inputs and outputs (X, Y) in different formats.
Solution: Initially started by developing SVM/KNN/Decision Trees and feeding them flattened images and expecting index value of the class as output. CNN on the other hand expected images in n-D and output in the format of a binary matrix with float values. Used numpy utilities (https://www.tensorflow.org/api_docs/python/tf/keras/utils/to_categorical) to transform label strings to a matrix with float values
-Issue 2: During pre-processing, creation of flattened arrays of different sizes was causing the error: VisibleDeprecationWarning: Creating an ndarray from ragged nested sequences (which is a list-or-tuple of lists-or-tuples-or ndarrays with different lengths or shapes) is deprecated. If you meant to do this, you must specify 'dtype=object' when creating the ndarray.
Solution: Create flattened arrays images to same size before training by reshaping all image to fixed size (224,224)
-Issue 3: One major advantage of using CNNs over other algorithms is that you do not need to flatten the input images to 1D as they are capable of working with image data in 2D. This helps in retaining the “spatial” properties of images
Solution: Creating the training dataset by normalizing the pixels and passing the image as it is.
-Issue 4: Low accuracy (~23%) when using CNN model
Solution: The initial approach relied on deriving the most likely class from the output probabilities. Moved away from this approach by transforming the output labels from indices to binary matrices with float values.
-Issue 5: Experimented with transfer learning for CNN model and achieved 100% accuracy
Solution: After receiving high accuracy (>95%) with a base CNN model, experimented further by leveraging VGG pre-trained models (https://www.tensorflow.org/api_docs/python/tf/keras/applications/vgg16/VGG16) to extract features. Using these features, the accuracy improved to 100%.
-Issue 6: When applying grayscaling, reshape causes input_image to lose a dimension (number_of_channels) [batch_size, img_height, img_width, number_of_channels]
https://www.analyticsvidhya.com/blog/2020/10/create-image-classification-model-python-keras/
Solution: Used np.expand_dims(random_test_frame,axis=0) (https://numpy.org/doc/stable/reference/generated/numpy.expand_dims.html) to add an extra dimension.To clarify, your input should of shape (no. of images,64,64,3) for RGB, in the case gray scaling the shape must be (no. of images, 64, 64,1)
-Issue 7: Experimented with using CNN for feature extraction and SVM/DT/KNN as base models
Solution: After receiving high accuracy (>90%) with base SVM/DT/KNN versions, experimented further with CNN's for feature extraction. This did not show significant improvements in latencies.
-Issue 8: When using sparse categorical cross-entropy as the loss function, received an error when using integer type labels (Error: Dense layer was expecting the output neurons size to be 1 rather than 6). To remediate this issue, applied mean_squared_error as the loss function which resulted in very low accuracy.
Solution: The problem with using sparse categorical cross-entropy is that this loss makes the assumption that the model outputs a scalar (a one element vector), and this is checked during runtime, and this check fails and that's why you get an error. (https://stackoverflow.com/questions/52147847/expected-shape-of-keras-dense-layer-output-with-300-units-is-1).Transforming indices to binary enables us to use categorical_crossentropy which showed a significant increase in accuracy accuracy.
-Issue 9: Fixing the KeyError: ‘acc’ and KeyError: ‘val_acc’ Errors in Keras 2.3.x or Newer
Contribution over References
-CNN with transfer Learning
-SVM with CNN for feature extraction,
-SVM with flattened image,
-Decision Tree with CNN for feature extraction,
-Decision Tree with flattened image array,
-K Nearest Neighbor with CNN for feature extraction,
-K Nearest Neighbor with flattened image array,
-Artificial Neural Networks
-CNN with transfer learning, experimentation with different loss functions (cross entropy, mean squared)
Performance Evaluation
- Convolutional Neural Networks With TransferLesrning VGG16 gives 100% ccuracy and Artificial Neural Networks gies the least
| - CNN with TL VGG16 imporves Acuracy as compared to CNN Without TL. |


Evaluations
Explored transfer learning by leveraging VGG pre-trained models (https://www.tensorflow.org/api_docs/python/tf/keras/applications/vgg16/VGG16) to extract features. Using these features, the accuracy improved from 98% to 100%.
Explored using CNN for feature extraction and feeding them to an SVM, DT an KNN.
SVM accuracy rate dropped from 90.38% with flattened image as input to 24% with feature extraction
Decision Tree accuracy rate dropped from 35% with flattened image as input to 22% with feature extraction
KNN accuracy rate improved from 84% with flattened image as input to 96% with feature extraction
Tried different train-test split ratios, the test dataset performance was consistently above 95% after shuffling the dataset and feeding it to the models.
For the CNN model without transfer learning, added a convolution layer and dense layer with relu activation function instead of softmax which brought significant accuracy improvements from < 20% to 99%
Explored different pre-processing techniques which included gray scaling, data augmentation, histogram equalization and rotation. All of these approaches decreased the accuracy.
Added dropout for regularization and more dense layers which led to further improvements in accuracy
Experimented with different optimizers, rms optimizer achieved >99% accuracy at the 10th epoch compared to adam which achieved the same at 22nd epoch
Batch size of the training data did not have significant impact to performance


Source: livebook a) The bias-variance trade-off b) Examples of underfitting, optimal fitting, and overfitting for a two-class classification problem
Further Improvisation
- Lazy Predict helps build a lot of basic models without much code and helps understand which models works better without any parameter tuning.
References
[1] Srikanth Tammina.Graduate in Electrical Engineering, Transfer learning using VGG-16 with Deep Convolutional Neural Network for Classifying Images DOI: http://dx.doi.org/10.29322/IJSRP.9.10.2019.p9420
machines, Geoscience and Remote Sensing, IEEE Transactions, 2004, Vol. 42, No. 6, pp.1335-1343[10] Hao Jiang, Wai-Ki Ching,Zeyu
Wild Animals Images(Kaggle Dataset)
GitHub: ImageClassifier with Results and Performance Measures(Used Google Colab Pro for speedup in memory and GPU)
